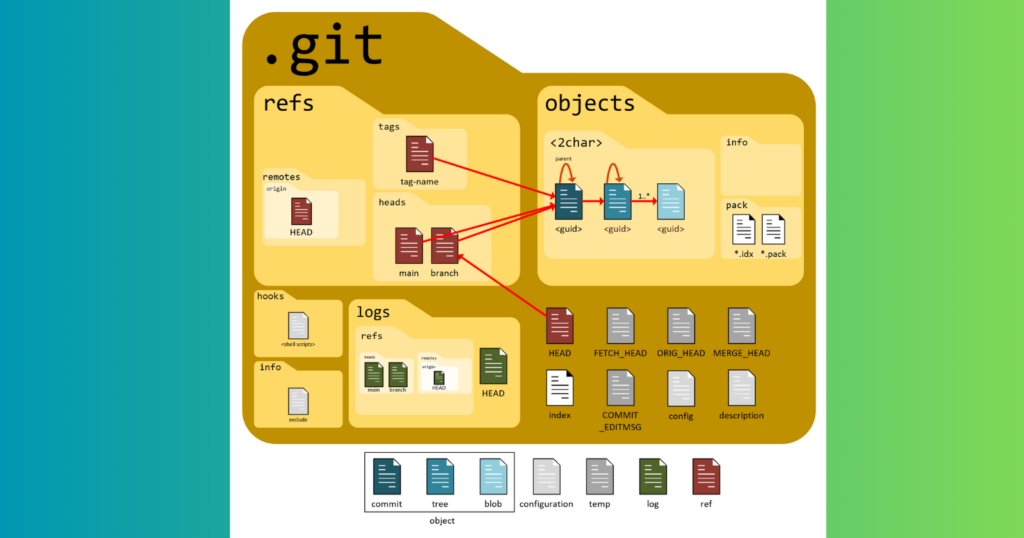
| Component | Description | |
|---|---|---|
 | Object Store | It holds blobs, trees, and commits. This is where blobs store files, trees hold the directory structure, and commits are a snapshot of states of projects. |
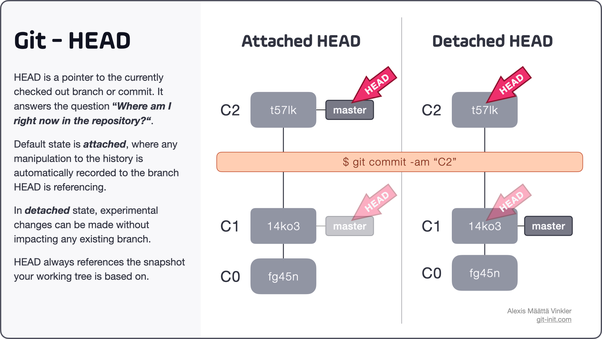
| HEAD | This refers to the latest commit on the current branch. This tells where changes need to be applied. | |
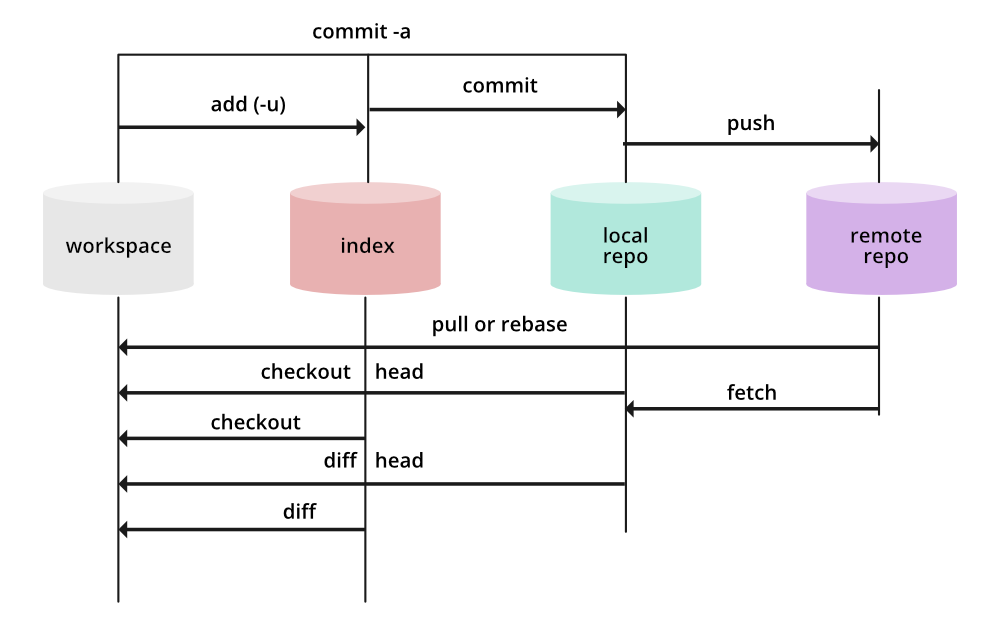
| Index | Also known as the staging area, it holds changes before they are committed. | |
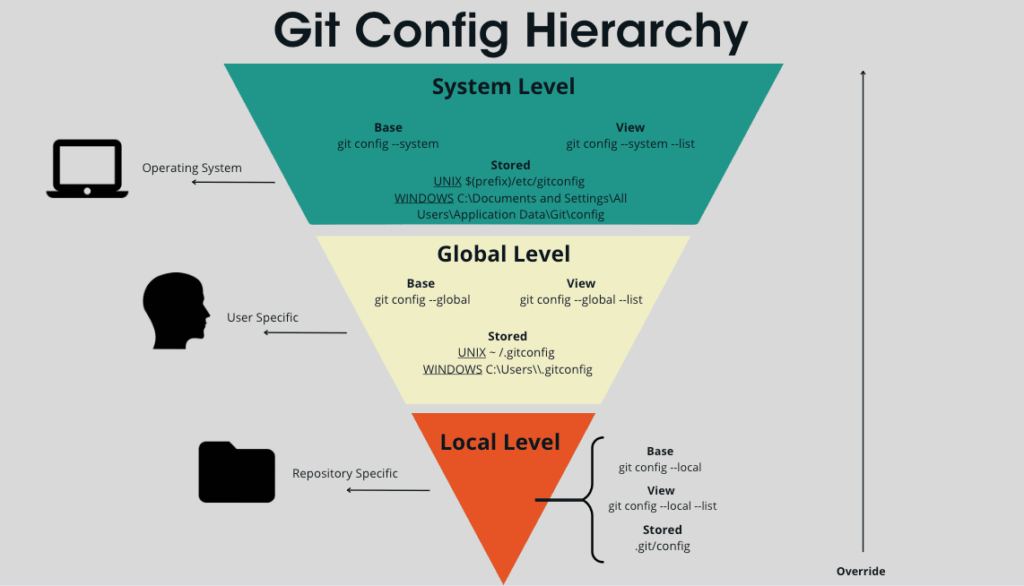
| Config | Project-specific settings that include user information, remotes, and preferences | |
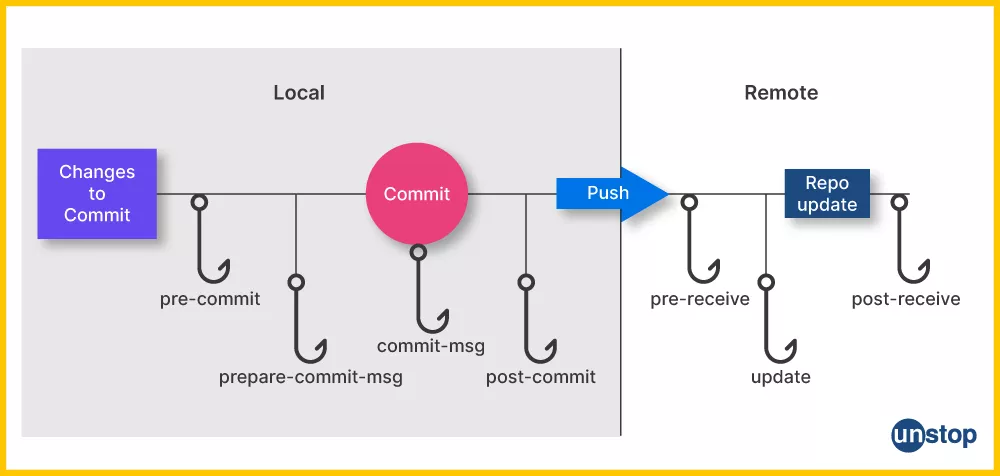
| Hooks | Scripts that automate tasks at specific points in the Git workflow, such as pre-commit checks. |
Introduction:
The .git directory is the backbone of Git, storing critical information that governs version control and collaboration within a project. In this article, we’ll delve into the depths of the .git directory, uncovering the secrets it holds and understanding its significance in the Git ecosystem.
What Does the .git Directory Store? In a Git project, all version control information is stored in the .git directory, including metadata, commits, branches, configuration files, and histories for changes. Thus, the modification of code will be efficiently tracked and managed.
A .git directory is a hidden directory that GIT uses to store all the metadata and object repository. If you delete the GIT repository there is a data loss in your application. Git Directory contains metadata and object database. It contains the information necessary to manage the repository including commit history, branches tags and configuration settings.
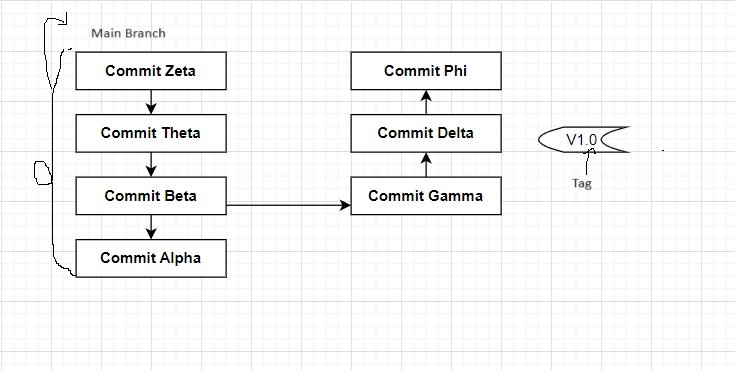
The state of every branch that has been merged to the main branch.
Commit History is how the main branch has changed over time with each contributors merge.
Tag is a fixed pointer used to highlight special events such as releases.
Configuration settings: It mainly includes the GIT configuration hierarchy of the system level, Global level, Local level.
The Anatomy of the .git Directory:
1.Object Store:
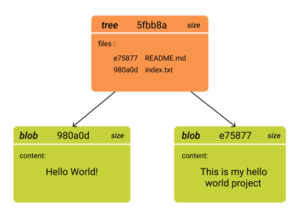
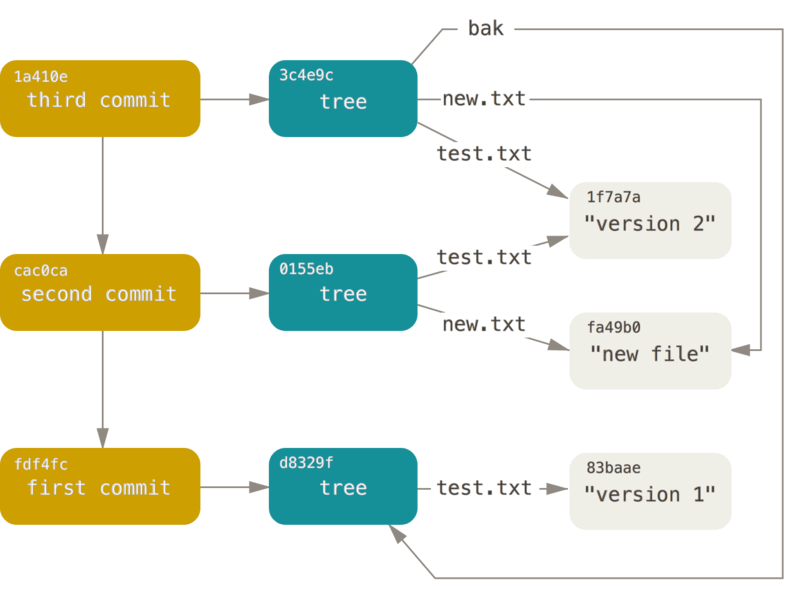
At the heart of the .git directory lies the object store, where Git stores the core building blocks of your repository – blobs for files, trees for directory structures, and commits for snapshots of your project at different points in time. Understanding how Git handles these objects is crucial for comprehending the repository’s evolution.
Let’s break down the concept of the Object Store in the .git directory with a simple example:
Consider a Git repository with the following file structure:
my-project/
|– README.md
|– src/
| |– main.py
| |– utils/
| |– helper.py
|– tests/
|– test_main.py
1.Blobs for Files:
The object store represents each file in your repository as a blob (binary large object). For instance, it stores the content of the README.md file as a blob.
2.Trees for Directory Structures:
Tree objects represent the directory structure. For example, a tree object represents the src directory, capturing the organization of files within it.
3.Commits for Snapshots:
Let’s say you make an initial commit. At this point, a commit object is created in the object store. This commit object points to the tree object representing the entire file structure at that particular moment. It also contains metadata such as the author, timestamp, and a commit message.
Now, let’s walk through a sequence of events:
Commit 1:Initial Commit
- You create the repository with the initial file structure.
- Git creates a commit object pointing to the tree object representing the entire structure.
- The blobs represent the content of individual files.
Commit 2:Adding a Feature
- You add a new file, main.py, inside the src directory and make another commit.
- Git creates a new blob for main.py and updates the tree object for the src directory.
- A new commit object is created, pointing to the updated tree and referencing the previous commit.
Commit 3:Modifying a File
- You modify helper.py inside the utils directory and commit the changes.
- Git creates a new blob for the modified helper.py and updates the tree object for the utils directory.
- Another commit object is created, pointing to the updated tree and referencing the previous commit.
Understanding this process helps you see how Git maintains a historical record of your project. Each commit is a snapshot of the entire project at a specific point in time, and the object store efficiently organizes and manages these snapshots for version control.
2.HEAD:
The HEAD file in the .git directory points to the latest commit in your working branch. It serves as a reference, indicating where your changes will be applied when you make a new commit. Grasping the role of HEAD is essential for navigating through different branches and commits.
Let’s illustrate the concept of the HEAD in Git with a practical example:
Consider a scenario where you have a Git repository with a simple commit history:
Commit A (branch: main)
|
Commit B
|
Commit C
|
Commit D (branch: feature-branch)
1.Initial State:
- You start with a main branch pointing to Commit A.
- The HEAD is attached to the main branch, indicating that this is the current working branch.
2.Creating a New Branch:
- You decide to work on a new feature, so you create a new branch named feature-branch at Commit A.
- The HEAD now points to the feature-branch because you’ve switched to this new branch.
Commit A (branch: main)
|
Commit B
|
Commit C
|
Commit D (branch: feature-branch, HEAD)
1.Switching Between Branches:
Now, you decide to switch back to the main branch.
Git updates the HEAD accordingly.
Commit A (branch: main, HEAD)
|
Commit B
|
Commit C
|
Commit D (branch: feature-branch)
|
Commit E (branch: feature-branch)
.Making Changes on the Main Branch:
While on the main branch, you make additional changes and commit them, creating Commit F.
The HEAD updates to point to the latest commit on the main branch.
Commit A
|
Commit B
|
Commit C
|
Commit D (branch: feature-branch)
|
Commit E (branch: feature-branch)
|
Commit F (branch: main, HEAD)
Understanding the role of HEAD is crucial in this example. The HEAD dynamically moves to the latest commit of the active branch. When you create a new branch or switch between branches, the HEAD adjusts accordingly. This mechanism allows Git to track where your changes will be applied when you make a new commit and aids in navigating through different branches and commits in your project’s history.
3.Index:
Also known as the staging area, the index is a vital component stored in the .git directory. It functions as a precursor to commits, holding changes you want to include in the next commit. A clear understanding of the index is crucial for managing your project’s version history effectively.
Let’s walk through an example to illustrate the concept of the Index (Staging Area) in Git:
Initial State:
You start with a clean working directory and a Git repository. Your current branch is main, and the HEAD points to the latest commit.
Commit A (branch: main, HEAD)
Making Changes:
You decide to work on a new feature and make changes to a file, let’s say main.py.
After making modifications, Git recognizes the changes as “unstaged” because they haven’t been explicitly marked for the next commit.
Changes (Unstaged):
main.py
Staging Changes:
Now, you want to include the changes in the upcoming commit.
You use the git add command to stage these changes.
Changes (Staged):
main.py
At this point, the changes are in the Index (Staging Area), ready to be committed. The Index serves as a snapshot of what the next commit will look like.
Committing Changes:
Once the changes are staged in the Index, you commit them using the git commit command.
Commit A (branch: main, HEAD)
|
Commit B (branch: main, HEAD)Changes from main.py included
The changes from main.py are now part of the version history in Commit B.
Making Additional Changes:
You continue working on your feature, making more changes to main.py.
Changes (Unstaged):
main.py
additional_file.py
Staging and Committing Again:
You stage the changes for main.py in the Index and commit them.
Commit A (branch: main, HEAD)
|
Commit B (branch: main)
Changes from main.py included
|
Commit C (branch: main, HEAD)Additional changes from main.py included
Now, Commit C reflects the latest changes, and the Index is once again empty.
Understanding the Index is crucial for managing your project’s version history effectively. It allows you to selectively choose which changes to include in the next commit, giving you fine-grained control over the evolution of your project. Separating the act of preparing changes from the actual commit helps maintain a clean and organized version history.
4.Config:
The config file inside the .git directory stores project-specific configuration settings. This includes user information, remote repository details, and other preferences. Knowing how to manipulate the config file enables you to customize Git according to your workflow.
Let’s walk through an example to illustrate the concept of the Git configuration file:
Checking Current Configuration:
To view your current Git configuration, you can use the git config –list command.
$ git config –list
user.name=Your Name
user.email=your.email@example.com
core.repositoryformatversion=0
core.filemode=true
core.bare=false
core.logallrefupdates=true
core.symlinks=false
…
This output shows some of the configuration settings, including the user’s name and email, as well as some core settings.
Setting User Information:
Let’s say you want to update the user email address. You can use the following commands:
$ git config user.email new.email@example.com
Now, if you check the configuration again, you’ll see the updated email:
$ git config –list
user.name=Your Name
user.email=new.email@example.com
core.repositoryformatversion=0
core.filemode=true
core.bare=false
core.logallrefupdates=true
core.symlinks=false
…
Configuring Remote Repository:
If you are working with a remote repository, you can set its URL in the configuration:
$ git remote add origin https://github.com/your-username/your-repo.git
This adds a remote named “origin” with the specified URL. You can also configure this directly in the configuration file.
Viewing Remote Configuration:
To view the remote configuration, you can use:
$ git remote -v
origin https://github.com/your-username/your-repo.git (fetch)
origin https://github.com/your-username/your-repo.git (push)
This shows the fetch and push URLs associated with the remote “origin.”
Customizing Git Behaviors:
You can customize various Git behaviors using the configuration. For example, configuring Git to rebase by default:
$ git config –global pull.rebase true
$ git config –global pull.rebase true
Editing the Configuration File Directly:
You can manually edit the configuration file using a text editor. The file is located in the .git directory:
$ nano .git/config
Here, you can modify settings directly.
Understanding how to manipulate the config file enables you to customize Git according to your workflow. Whether it’s setting user information, defining remote repositories, or configuring specific behaviors, the Git configuration is a powerful tool for tailoring Git to suit your needs.
5.Hooks:
Git allows you to integrate custom scripts at various points in the version control process through hooks. The .git directory houses the hooks directory, where you can deploy scripts to automate tasks such as pre-commit checks or post-receive actions.
Let’s walk through an example to illustrate the concept of Git hooks:
Understanding Hooks Directory:
In the .git directory of your Git repository, there’s a directory called hooks. This is where you can place your custom scripts to be executed at different points in the version control process.
my-project/
|– .git/
| |– hooks/
| |– pre-commit
| |– post-receive
| |– …
Creating a Pre-Commit Hook:
Let’s say you want to implement a pre-commit hook that checks for trailing whitespaces in your code. Create a file named pre-commit in the hooks directory:
$ touch .git/hooks/pre-commit
$ chmod +x .git/hooks/pre-commit
Editing the Pre-Commit Hook Script:
Open the pre-commit file with a text editor and add the following script:
#!/bin/bash
#Pre-commit hook to check for trailing whitespaces
if git diff –check –cached; then
echo “Pre-commit check passed: No trailing whitespaces found.”
exit 0
else
echo “Error: Trailing whitespaces found. Please remove them before committing.”
exit 1
fi
This script uses git diff to check for trailing whitespaces in the changes about to be committed. If any are found, it prevents the commit and provides an error message.
Testing the Pre-Commit Hook:
Now, make changes to a file and try to commit:
$ echo “Some code with trailing whitespaces ” >> myfile.py
$ git add myfile.py
$ git commit -m “Adding a file with trailing whitespaces”
The pre-commit hook should prevent the commit and display an error message.
Creating a Post-Receive Hook:
Let’s create a post-receive hook that sends a notification after changes are received on the remote repository. Create a file named post-receive:
$ touch .git/hooks/post-receive
$ chmod +x .git/hooks/post-receive
Editing the Post-Receive Hook Script:
Open the post-receive file with a text editor and add the following script:
!/bin/bash
Post-receive hook to send a notification
echo “Changes have been received on the remote repository. Sending notification…”
Add your notification command here
This script can be customized to send notifications via email, messaging services, or any other means you prefer.
Testing the Post-Receive Hook:
Push changes to the remote repository:
$ git push origin main
The post-receive hook should execute, and the notification message should be displayed.
Git hooks allow you to automate tasks and enforce specific workflows at different stages of the version control process. Whether it’s ensuring code quality with pre-commit checks or triggering notifications after receiving changes, hooks provide a powerful mechanism for customization.
Security and Integrity:
The .git directory plays a pivotal role in maintaining the integrity and security of your repository. By understanding its contents, you can appreciate how Git tracks changes, facilitates collaboration, and ensures the reliability of your version-controlled project.

